Late Season Guide: When to Plant Tulips
Many gardeners fret over missed deadlines, but the truth about when to plant tulips often holds a delightful surprise for late-season enthusiasts. While conventional wisdom suggests early autumn, precise timing, tailored to your unique growing zone, can still yield stunning results, challenging the notion that late planting automatically means lost blooms. In fact, a strategic late-season strategy can sometimes protect delicate bulbs from common early-winter ailments. This comprehensive guide will empower you with the data-driven insights and practical steps to ensure your tulips flourish, regardless of a slightly delayed start.
Table of Contents
Tools & Soil Requirements
Preparing for your tulip planting adventure requires the right gear and a keen understanding of your soil. For a successful when to plant tulips effort, arm yourself with:
- Trowel or Bulb Planter: Essential for creating appropriately sized holes. A bulb planter can be a game-changer for larger plantings, saving you time and effort.
- Gardening Gloves: Protect your hands from dirt and potential irritants.
- Watering Can or Hose: For a good initial soak after planting.
- Soil Amendments (Optional but Recommended): Compost, well-rotted manure, or bone meal to enrich the soil.
- Measuring Tape or Ruler: To ensure correct planting depth.
Tulips thrive in loamy, well-draining soil. Think of the kind of soil that feels rich and somewhat crumbly in your hands – not overly sandy and certainly not heavy clay that retains too much water. Good drainage is paramount, as soggy conditions are a death knell for tulip bulbs, leading to rot. Aim for a soil pH between 6.0 and 7.0 (slightly acidic to neutral). If you’re unsure about your soil type, a simple soil test kit can provide invaluable insights. Climate-wise, tulips prefer regions with distinct cold winters, as they require a chilling period to produce those iconic spring blooms.
Best Planting Season & Timing
The optimal time for when to plant tulips generally falls between September and December, after the first hard frost but before the ground freezes solid. This typically aligns with soil temperatures consistently below 55°F (13°C). Planting during this window allows the bulbs to establish a robust root system before winter sets in.
Expected Germination Time: Tulip bulbs don’t “germinate” in the traditional sense like seeds. Instead, they root and undergo a chilling period. True top-growth (sprouts) typically emerges in early spring, usually 4-8 weeks after the soil begins to warm.
Time to Maturity (Bloom): From the moment the sprouts appear, you can anticipate stunning blooms in approximately 2-4 weeks, depending on the variety and local weather conditions. For example, early-blooming varieties might flower in March, while late-season types could grace your garden into May. This rooting and chilling phase is critical; a properly chilled bulb will produce a flower up to 30% larger and more vibrant than one that hasn’t received adequate cold exposure.
Step-by-Step Planting Instructions
Ready to transform your garden? Let’s get those tulip bulbs flower planting like a pro!
1. Choose Your Bulbs Wisely
Select firm, plump, and healthy bulbs. Avoid any that feel soft, look moldy, or have significant cuts. Larger bulbs generally produce larger flowers. For a personalized touch, consider a mix of early, mid, and late-season varieties to extend your bloom period.
2. Find the Perfect Spot
Tulips demand full sun, meaning at least 6 hours of direct sunlight per day, especially during their blooming period. Consider north-south facing beds where they’ll receive ample light. For urban gardeners, even a sunny balcony container can be a perfect home.
3. Prepare the Soil
Dig down about 8-12 inches (20-30 cm) and amend heavy clay soils with compost or peat moss to improve drainage. For sandy soils, adding compost will help retain moisture and nutrients. A dash of bone meal at the bottom of the planting hole provides essential phosphorus for strong root development.
4. Dig the Right Depth
A general rule of thumb is to plant bulbs 2-3 times deeper than their height. So, a 2-inch (5 cm) tall bulb should be planted 4-6 inches (10-15 cm) deep. Space them 4-6 inches apart for a natural, clustered look. This deep planting helps protect them from temperature fluctuations and critters.
5. Position the Bulb Correctly
Place the bulb with the pointed end facing upwards. This is where the sprout will emerge. The flatter, broader end is where the roots develop. Don’t worry too much if you plant one sideways; the plant will usually adjust, but it might take a little more energy.
6. Cover and Water
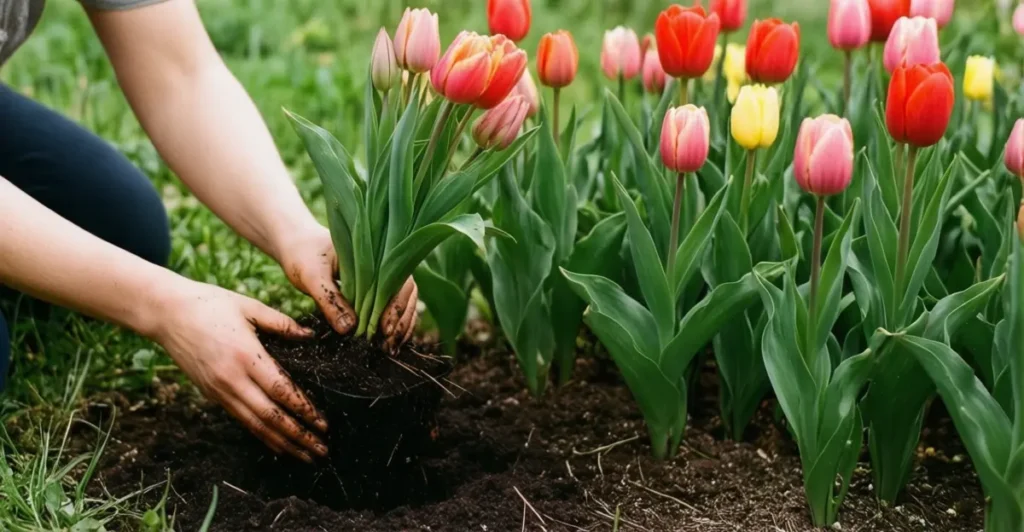
Gently backfill the hole with soil, ensuring no air pockets remain. Lightly tamp down the soil with your hand. After planting, give the area a thorough watering. This settles the soil around the bulbs and kick-starts root growth.
Plant Care Essentials
Once planted, your tulips are relatively low-maintenance, but understanding their basic needs ensures a spectacular show.
- Water Needs: After the initial watering, restrict watering unless conditions are unusually dry. Overwatering is the most common cause of bulb rot. Once foliage emerges in spring, water weekly if there’s no significant rainfall. During and after blooming, reduce watering gradually.
- Sunlight Requirements: As mentioned, full sun is non-negotiable for vibrant, healthy tulip blooms. In overly shady conditions, tulips tend to produce leggy stems and smaller, less intense flowers.
- Temperature Tolerance: Tulips are hardy in USDA Zones 3-8, requiring that cold chill (vernalization) to flower. They are remarkably resilient to winter cold once established but are susceptible to frost damage once new shoots emerge in spring. A light layer of mulch can help moderate soil temperatures.
- Nutrient Needs: While initial soil preparation provides ample nutrients, a balanced, slow-release fertilizer in early spring can boost bloom vigor. Avoid high-nitrogen fertilizers, which promote leafy growth over flowers.
Best Varieties & Companion Plants
Diversify your garden with these resilient and rewarding tulip varieties:
- Darwin Hybrid Tulips: Known for their robust nature, massive blooms, and strong stems, making them ideal for cut flowers. “Apeldoorn” and “Designer Triumph” are classic, disease-resistant choices.
- Fosteriana Tulips (Emperor Tulips): Early bloomers with impressive, large flowers and a good perennializing habit. “Red Emperor” and “Purissima” are reliable choices.
- Species Tulips: Smaller but incredibly tough, these naturalize well and come back year after year. Tulipa clusiana ‘Lady Jane’ is a charming example, perfect for rock gardens.
Creative Companion Planting:
- Muscari (Grape Hyacinths): Their small, blue flowers emerge around the same time as early tulips, creating a beautiful contrast and helping to deter rodents with their scent.
- Daffodils: Excellent companions as they are generally deer and rodent-resistant, offering a natural barrier of protection for your tulip bulbs.
- Creeping Thyme: Planted as a groundcover, it suppresses weeds, retains soil moisture, and its delicate flowers in spring complement the bold tulips.
- Pansies/Violas: For a burst of complementary color at the base of your emerging tulips, these cheerful annuals provide early spring interest and won’t compete for nutrients.
Landscape Uses & Harvest Tips
Tulips are incredibly versatile, offering endless possibilities for garden design.
- Borders & Edges: Plant tulips in drifts along pathways or at the front of garden beds for a spectacular spring display.
- Container Gardening: For smaller spaces or urban dwellings, tulips thrive in pots. Just ensure containers are deep enough (at least 12 inches) and have excellent drainage. Layer different varieties for continuous blooms.
- Cutting Garden: Many tulip varieties make magnificent cut flowers. For the longest vase life, harvest stems when the buds are still closed but showing color. Cut the stem at an angle and immediately place them in water.
- Personalized Tip: Try “lasagna planting” in containers. Layer early, mid, and late-season tulip (and other bulb) varieties at different depths in the same pot, ensuring a continuous bloom from early spring to early summer!
Common Pests & Diseases to Avoid
While generally robust, tulips can face a few challenges. Data shows that proper spacing and good air circulation can reduce fungal diseases by up to 40%.
- Rodents (Squirrels, Voles): These furry fiends love tulip bulbs.
- Prevention: Consider planting bulbs in wire cages, using a deterrent like gopher plant (Euphorbia lathyris) nearby (though plant with caution as it’s toxic), or scattering sharp gravel in the planting hole. Some gardeners sprinkle cayenne pepper around new plantings, but it needs reapplication after rain.
- Aphids: Small sap-sucking insects that can distort foliage and blooms.
- Treatment: A strong blast of water or an insecticidal soap spray usually handles mild infestations. Introduce ladybugs for a natural predatory solution.
- Slugs & Snails: Especially problematic in damp conditions, they can chew holes in leaves and petals.
- Prevention: Use diatomaceous earth around plants, set beer traps, or handpick them in the evening.
- Tulip Fire (Botrytis Blight): A fungal disease causing brown spots on leaves and flowers, often leading to mushy, rotting bulbs.
- Prevention: Ensure good air circulation, avoid overhead watering, and remove any infected plant material immediately. Planting disease-resistant varieties also helps. If a bulb is infected, it’s best to remove and discard it to prevent spread.
- Bulb Rot: Usually caused by overly wet, poorly draining soil.
- Prevention: The best defense is excellent drainage and avoiding overwatering. Amend heavy clay soils before planting.
Seasonal Maintenance & Overwintering
Ensuring the longevity and quality of your tulip blooms involves specific seasonal care.
- Post-Bloom Care: After flowering, resist the urge to cut off the foliage immediately! The leaves are crucial for photosynthesizing and storing energy back into the bulb for next year’s bloom. Allow the foliage to naturally yellow and die back for at least 6 weeks (8-10 weeks is ideal) before removing it.
- Deadheading: Remove faded flower heads (deadheading) to prevent the plant from putting energy into seed production. This energy is then redirected to the bulb for stronger future blooms.
- Fertilizing (Optional): A light feeding of a balanced bulb fertilizer can be applied after blooming to further replenish the bulb’s reserves, especially for perennializing varieties.
- Overwintering (for Perennializing Tulips): While some tulips are annuals in many climates (especially classic Darwin Hybrids), species tulips and certain sturdy varieties can return for several years. For these, a winter mulch of straw or leaves can protect them from extreme temperature fluctuations. In very cold zones (USDA Zones 3-4), some gardeners lift tender bulbs after the foliage dies back, store them in a cool, dry place over winter, and replant in spring – though this is more common for non-hardy bulbs.
Conclusion
So, is it too late to plant those magnificent tulips? Absolutely not! Armed with these data-driven insights and practical steps, you can confidently plant your when to plant tulips—even later in the season—and anticipate a riot of spring color. From selecting the perfect bulb to understanding soil pH, and mastering aftercare, you now possess the knowledge to cultivate a truly breathtaking display. Your garden is a canvas waiting for these vibrant masterpieces.
Don’t just dream of spring blooms—make them a reality!
Now that you’re a tulip-planting expert, we want to see your success! Share your garden photos and stories in the comments below, or tag us on social media. Eager for more gardening wisdom? Explore our other guides on companion planting and organic pest control to further enhance your green thumb journey!
FAQs
Q1: Can I plant tulips in spring?
A1: Generally, no. Tulips need a cold dormancy period (vernalization) of about 10-14 weeks at temperatures below 45°F (7°C) to flower properly. Bulbs planted in spring will not have this chilling period and likely won’t bloom in the same year. If you’ve missed the autumn window, consider “pre-chilled” bulbs available in late winter, which can be planted for spring blooms, but their naturalizing ability often diminishes.
Q2: How deep should tulip bulbs be planted?
A2: A good rule of thumb is to plant bulbs 2-3 times deeper than their height. For an average 2-inch tulip bulb, this means planting it 4-6 inches deep. This depth protects them from temperature extremes and hungry critters.
Q3: Why didn’t my tulips bloom?
A3: Several factors can cause tulips to not bloom: insufficient chilling period, planting in too much shade, overwatering (leading to rot), poor soil drainage, pest damage, or the bulbs being “spent” (some hybrids only bloom reliably for a year or two).
Q4: Do tulips need a lot of water?
A4: Not typically. After initial watering at planting, tulips prefer dry conditions during their dormancy. They need moderate watering when foliage emerges and during bloom if rainfall is scarce. Overwatering is a common killer, so ensure excellent drainage.
Q5: Can I leave tulip bulbs in the ground year-round?
A5: Yes, in USDA Hardiness Zones 3-8, many tulip varieties can be left in the ground. Species tulips and some Darwin Hybrids are known for perennializing (returning each year). However, many “florist” tulips are often treated as annuals, as their vigor diminishes after the first year. In colder zones, a protective layer of mulch can help.
Q6: How do I deter squirrels from eating my tulip bulbs?
A6: Squirrels are notorious for digging up bulbs. Try planting bulbs with squirrel-repelling plants like daffodils, using a bulb cage made of chicken wire, or sprinkling a predator-scent deterrent or cayenne pepper around the planting area. Deeper planting can also make them harder to find.